Pages

Sunday, 17 August 2014

It's a Mystery!


 Nicky Hayden recently made this fab card with her Tuesday afternoon cardmaking ladies. The optical illusion with the magnifying glass is great...read on to find out how it's done!
 
Recipe
1 piece of black card 5 1/2" x 3 3/4"
4 pieces of black card 5 1/2" x 1 3/4"
1 piece of pattern A paper 5 1/4" x 3 1/2"
2 pieces of pattern A paper 5 1/2" x 1 1/2"
2 pieces of pattern B paper 5 1/4" x 1 1/2"
Blank gatefold C6 card and envelope
Cream card for stamping and embossing
Sheena Douglas Mystery Author and I Spy stamp sheets
clear embossing powder
 
Method
Ink around the edges of all the patterned pieces of paper.
 
Stamp the questions marks all over the 2 smallest pattern A pieces of paper using black versafine ink, making sure you do a second stamp without re inking (don't do more than 2 each time though as it won't look quite so nice)
 
Stick the large piece of black card in the centre of the open gatefold card and two of the smaller panels onto the inside panels.
Stick large pattern A and the two stamped pieces.


Stick the last 2 pieces of black card to the front side panels of your card and wrap the ribbon around the card, ensuring you have an equal length on both sides. Stick the pattern B paper over the top to secure the ribbon in place. Stamp the question mark in the bottom right hand corner if you wish.
 
Stamp the typewriter onto the cream card with black versamark ink, sprinkle with clear embossing powder and heat set. Stamp your chosen words onto the page in the typewriter, then cut out and stick on the centre panel of the card.
 
Stamp the mystery greeting and emboss, cut out and mount onto a small scrap of black card.


Now the tricky bit! Stamp the words again and them stamp over them with the magnifying glass. Sprinkle with embossing powder and heat set. Cut out just the magnifying glass leaving the wording in the middle, then mount over the original greeting, lining up the lettering carefully, so that you have a clever optical illusion.
 
Finish by adding glossy accents to the centre of the magnifying glass, but be aware that it will need to stay flat to dry for at least an hour!
 
Thanks for popping by
Cate
x
 

Thursday, 31 July 2014

Vintage Floral Card


Nicky Hayden recently held a couple of workshops to make this beautiful card using the Vintage Floral collection from Crafters Companion and The Papermania Botanical collection. It has a beautiful timeless quality and would be gratefully received on any occasion!
 
Recipe
 
6" Card blank and Envelope
Cream card 2 1/2" x 3 3/4"
Pink card 2 5/8" x 3 7/8"
Vintage Floral Paper 3 3/4" x 3 3/4"
Pink card 4" x 4"
Vintage Floral paper 1" x 6"
Vintage Floral paper 2" x 6"
2 large die cut flowers
2 medium die cut flowers
Lace, Bead String, Pearls & small Pearl Medallion
Victorian flower decals
Insert
 
Method
 
Begin by embossing the front of the card blank with the Vintage Rose embossing folder and then edge with Tattered Rose Distress Ink.
 
Stamp the Red Rose Botanicals stamp from Papermania onto the small piece of cream card, colour with pencils, round the corners using a punch and mount onto the small piece of Pink card.


Now stick the 2" piece of paper about 1 inch from the bottom across the front of your card, then stick the large pink square centrally over this followed by the corresponding piece of Vintage Floral patterned paper.
 

Stick the lace across the first strip of paper and then attach the 1" paper strip to slightly overlap the top of the lace, trim the edges of any excess paper.
 
Use strong glue to attach the pearl strip across the join of the paper and lace.
 
Mount your stamped image using foam pads to the front of your card. Stamp a sentiment onto pink card use a distress ink to ink the edges, add pearls and mount onto the card.


To make your flower, spritz each of the die cut flowers with water, scrunch them up and spritz with a gold spritzing spray. Un scrunch them carefully and dry them with a heat tool (it's best to leave them to dry naturally if you have time).
 
When the flowers are dry stick them all together, add a pearl medallion to the centre and attach to your card.
 
Lastly attach a couple of Victorian flower decals to finish.
 
Thanks for popping by
 
Cate
x


Friday, 4 July 2014

What an Incredible, Awesome, Amazing Day!


This scrapbook page of my daughter was inspired by the beautiful Storyteller collection from Kaisercraft...I love the fresh vibrant colours that perfectly reflect the sheer joy on her little face in the photograph.


I created the patchwork effect by cutting different sizes of co-ordinating papers and attaching them to a plain white piece of cardstock...I then added faux stitching to enhance the homemade effect.


The paint effect was created using an ink spritzer...they are such fun to use and I love the shrieks and squeals from the ladies in my workshops when they are using them!! Doodling was added to the flags to further highlight the homemade theme.


 Kaisercraft sentiments are fab and this one, which I cut to fit,  is perfect for my layout...


I dusted off my Sew Easy tool to create the heart stitching, it's so easy to use and there is something quite satisfying about stitching on paper!


Stapled ribbons finish the layout.
 
 
Thanks for popping by
Cate
x

Sunday, 1 June 2014

Pop up cards made easy!


 Nicky Hayden has become an expert at making these fun pop up cards! She shares how...
 
Recipe
1 Piece of cardstock  8.5” x 12”   (21.5cm x 30.5cm) 
4 Pieces of patterned paper 2.5” x 2.5”    (6.3cm x 6.3cm)
3 Pieces of patterned paper 3.5” x 2.5”    (8.9cm x 6.3cm)
1 Piece of white card 6.25” x 2.5”    (15.8cm x 6.3cm)
selection of die cut flowers or decoration of your choice.
 
 
Method
  1. Score the large cardstock along the long edge at 2.75” (7cm),  5.5” (14cm), 8.25” (21cm) and 11” (28cm
  2. Do a quarter turn and score again at 2.75” (7cm)
  3. On the opposite side to this score line cut off 2” and keep to one side
  4. Using scissors cut down the score lines to the 2.75” line.
  5. On the last score line (11”) cut the piece off along with a diagonal piece on the bottom section, this makes a tab to stick the box together.
  6. Get the 2” strip you kept from earlier, put it in the trimmer making sure you are on the 1” end, line up the card at the 4.75” and cut, then turn a quarter turn and cut in half so you have two pieces of identical card with a score line each end!
  7. To make the box use strong tape on the narrow flap and stick to the back of the last panel on the other end, making the box.  The reason that I stick it to the outside is so that you have 4 seamless corners and its going to be covered up anyway.
  8. Take the two little strips of card and stick into the box flush with the opening.
  9. Now you just have to decorate and stick in your pop up elements, I use some thick acetate  to make my sticking up parts, but a pretty cardstock will work just as easily.


 .  
Thanks for popping by!
Let us know what you think...
Cate x
 

Sunday, 11 May 2014

Time Flies Scrapbook Page


I recently took a photograph of my little girl with her friends on a day out in the sunshine.  I love the photograph and it instantly reminded me of one we had taken when they are babies...I can hardly believe that they are 4 already...time flies!
 
It gave me the perfect opportunity to use Kaisercraft papers from the Honey Chai and Kaleidoscope collections.


I wanted the picture to have a 3d effect so I 'framed' the page and cut butterflies from a pretty piece of paper, some of the butterflies were coloured using Promarker pens.


I love using paint and masks on my pages and this Kaisercraft clock mask was perfect for the page.


The page title hearts were punched and stamped using mini alphabet stamps, then tied to a piece of twine.


The words on the page were cut from the bottom strip of the paper...such a fab idea from Kaisercraft, I love that the bottom strip can be used too!
 
Thanks for popping by
Cate
x
Friday, 25 April 2014

Decorated Pumps


 Sue Tedeschi recently transformed a cheap and cheerful pair of pumps into something special! It's so cost effective and quick to do, here's how...
 
Recipe
Plain Pumps
Soft Paintbrush
 
Method
Separate the napkins into the fine layers. Tear the pieces you wish to use from the napkin, a torn edge makes it easier to blend the pieces together. It's also worth noting that a napkin with a white background will work better on a pair of white pumps.
 
You could also use rubber stamps with Stazon Inks, to decorate the plain tissue layer and use this.


 Lay the torn tissue flat where you would like it to be and apply it to the shoe using Jo Sonja's Textile medium.  Load your paintbrush well with the medium and, with soft strokes, apply it to the tissue - working from the centre of the piece outwards. Ensure that plenty of medium is applied...if the tissue seems to be tearing it usually means that not enough medium is being used.
 
Once the required design has been achieved leave to dry well – this could take up to a week.
 
To give a water proof finish to the canvass, cover with Jo Sonja All Purpose Sealer, then leave to dry – again this could take up to a week.


Why not come to one of our Home Décor workshops and give it a go!
 
Thanks for popping by
Cate
x


Saturday, 12 April 2014

Cotton Reel Place Setting


These place settings are not only cost effective, but are so quick and easy to make!
 

Stick double sided tape to the reverse of your chosen ribbon and wind it around the cotton reel. Using a glue gun attach a couple of flowers to the cotton reel and then stick a paper clip in the hole at the top...it really is that easy! You could also embellish with buttons, wooden shapes or sparkle, the possibilities are endless!
 
A printed name or photograph can be placed into the paper clip to make the perfect place setting or photograph clip.
 
Thanks for popping by
Cate
X


Sunday, 2 February 2014

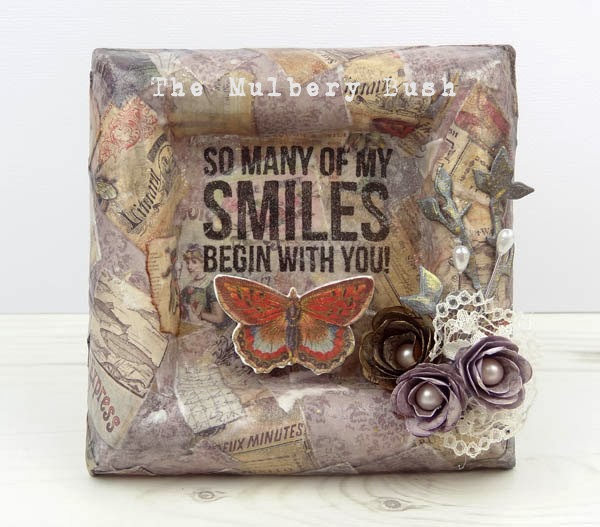
Madame Payraud Butterfly Frame


Nicky Hayden recently turned a Papier Mache frame into a stunning fridge magnet using the Madame Payraud collection and one of my favourite Kaisercraft stamps.


The papers were torn into small pieces and applied to the frame using Jo Sonja All Purpose Sealer. The sealer not only sticks the papers but also seals it with a lovely shine.
 

The sentiment was stamped onto tissue and applied to the centre of the frame, also using the All Purpose medium. A really effective technique as the tissue becomes transparent and it is much easier than stamping directly on to your project.
 

A Madame Payraud 3d butterfly looks perfect and is easy to apply.


Nicky made the flowers from the same papers, spritzed them with a metallic Gold spray and popped a pearl into the centre. A touch of lace and pearl topped pin add the perfect pretty finishing touch.
 
Magnetic strip was adhered to the back of the frame to finish. What a lovely gift for a special person!
 
 
Thanks for popping by
Cate
x


Monday, 27 January 2014

Parisienne Blue Calendar


Nicky Hayden recently made this gorgeous calendar using Papermania's Parisienne Blue collection.

Recipe
1 Piece of Mount Board 6" x 6"
2 Pattern Papers 8" x 8"
1 Piece Pattern Paper 4" x 3"
1 Piece Pattern Paper 1.25 x 6"
1 Piece Kraft Card 1.5" x 6"
1 length of Self Adhesive Lace 4"
1 Button
1 12" Length of Ribbon
Die Cut Paper Lace Strip
1 Flower
Self Adhesive Pearls
 
 
Method
Cover the Mount Board in one of the 8 x 8 papers.
Cut the other 8 x 8 paper to 5 x 5" and set the remainder aside for later decoration.
Secure the long piece of ribbon to the back of the board and stick the 5 x 5 paper over the back covering the ribbon ends.


Cut the paper off cut from above to 5x3 and ink the edges. Secure it to the front of the calendar as above.
Next stick the piece of 4 x 3 in place, slightly overlapping the first piece. Attach the self adhesive lace along the top and finish with self adhesive pearls.


Stick the long strip of paper in the centre of the card strip and attach to the front of your calendar. Attach the die cut lace strip and decorate with pearls and a ribbon bow.


Attach the calendar to the calendar and finish with a paper flower and button.


Thanks for popping by
We love your feedback
Cate
x


Friday, 17 January 2014

Sparkle Scrapbook Page


This page recently featured on one of our scrapbook workshops. I was desperate to use the new canvas hearts and Kaisercraft stamps in stock, and I wanted to prove a point that you can use pretty floral papers for boys!


 Tim Holtz distress inks are another big favourite at the moment and I have used the Corduroy ink pad to edge all my papers...I love the aged effect, and it really blends all the papers together.
 
 
Floral papers are great for creating a patchwork effect and the panels on this Kaisercraft True Romance paper make it really easy!
 

I stamped one of my favourite sentiments onto a canvas heart and applied Tim Holtz ink to give it a distressed look, I think it works really well with the twine.


Ribbons and lace add interest to the page...
 
 
...and of course buttons!
 
Check out our facebook page to see how a different photograph on the page can really change the layout!
 
Thanks for popping by
Cate
x


Sunday, 5 January 2014

Decorated Pencil Pot


This stunning pencil pot was Decorated by Sue Tedeschi using Jo Sonja Paints, Mediums and Napkins. It's surprisingly easy to achieve, and I think you'll agree that the results are stunning!
 
 
Materials required:
Serviettes               
Sponges/ soft brush
 
Start by preparing the background colour for the pencil pot. You can buy the background colours ready mixed or you can make your own colour using the white as your base and adding small amounts of the artist colours to achieve the desired effect.
 
Mix the paint with APS ratio 2:1 and apply to the wood. The APS helps give a better cover to the wood without soaking too far into it. You can apply the paint with either a sponge or a brush. Leave to dry.


Once dry apply a coat of Décor Crackle to the area that you would like cracked. Load your brush well with the medium and let it flow off of the brush. DO NOT WORK THE CRACKLE MEDIUM TOO MUCH. It must flow off of the brush and leave a good layer where required. You get bigger and better cracks if the medium is a thicker layer but if you work the medium too much it with not activate. You can accelerate the drying time with a hairdryer.
 
Once the medium is dry you can apply a contrasting top coat of paint, do not over work the paint, as if you over work it you may hamper the cracking process.
 
When choosing your top coat colour, please be aware that the crackle will not work if a metallic paint is used (ie Gold) or a iridescent/pearl paint.
 
You will get a different crackle effect according to how you apply the top paint. A sponge will give you a random crackle, a brush will give you a bark effect.
 
This will give you a fine crackle effect. If you would like the effect to be more drastic apply a layer of Crackle Medium and allow to dry.


Next separate the tissues into the fine layers. Tear the tissue to give you the patterns that you wish to use. A torn edge makes it easier to blend the pieces together.
 
Apply the torn tissue to the pencil pot using the All Purpose Medium. Lay the tissue flat where you would like it to be. Load the brush well with the medium and, with soft strokes, apply the medium to the tissue - working from the centre of the piece outwards. Ensure that plenty of medium is applied. If the tissue seems to be tearing it usually means that not enough medium is being used.


If you want to varnish your piece, make sure you leave it for at least a couple of weeks in case you re activate the crackle medium and it cracks your varnish.


It's that easy! Please do not hesitate to pop in and see us or give us a call if you would like further advise or information. Sue runs regular workshops if you would like to join us for some painting fun!
 
Thanks for popping by
Cate
x